|
How to choose a screen
"What's the best screen?" It's a common question along with, "Where can I get the cheapest screen?" Well, I'll try to answer the former and you can then work out the latter yourself!
When faced with a question like, "What's the best?" I choose to answer with another question. Usually, "What do you want it to do?" You see, screens are "Application Specific" devices. Which means that what works well in one situation may give less than satisfactory results in another! So, lets talk about screens, their function and how to choose "The best one for YOU"
Screens are available for many different applications. Rear projection, front projection, curved and flat etc. Replay of still images, replay of moving images in low or high ambient lighting. For the purposes of this exercise though we're going to limit ourselves to front projection suitable for domestic living spaces. So no IMAX's here.
The cinema screen is often the most scrimped on part of a video projection system, but it can make or break a presentation system. Choose the wrong screen and half the audience may be sitting there asking themselves what all the fuss is about. Screens are generally in two parts. The material and the housing/frame. Let's look at how to choose the ideal frame first.
Fixed: ie The screen is like a picture that hangs on the wall in a frame
For the image to be in focus across its entire surface the screen material must be FLAT. So when choosing a fixed wall mount frame make sure the frame is not warped at all. It might seem like a good idea to make a frame from that old bit of flooring lying in the garage, but it might not look so good in a year's time! That's why the best are made from steel and are welded on very accurate jigs. The wider the frame the more important this is going to be as small errors are magnified over a large span.
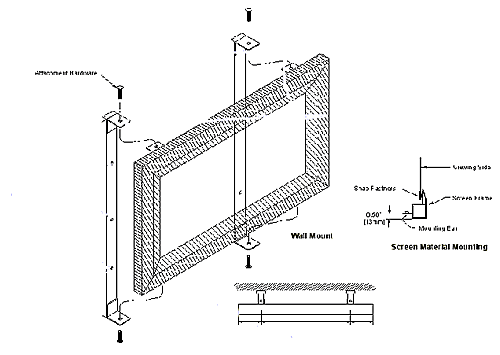 Screen capture courtesy of Stewart Filmscreens
With most projection systems it's necessary to "overscan" the image on to the edges of the screen frame. This gives a nice sharp edge to the image and enhances the viewing experience. If the frame isn't covered with a non-reflective surface though you will see this overscan. At times it can be quite annoying. Many manufacturers give an option of a black velvet covering for their frames and if it's available then I would wholeheartedly recommend taking it. If you're a D-I-Yer why not try to get the same effect with black felt.
Electric screens:
Come in a variety of shapes and sizes as well. Of course, they have no frame for the material to be stretched and tensioned to. Cheap electric screens weight the bottom of the screen and allow this to apply tension to keep the material flat. In practice what can happen is that the edges of the screen may still curl, which means bad focus. Some manufacturers use "tab tensioning" to get round this. This is a wire which the sides of the screen are attached to. When the screen descends, the wire is stretched tight pulling out the edges of the screen and keeping it taught in the process. Unsurprisingly this added manufacturing cost increases the retail price. Other manufacturers choose a slightly different approach to this very real problem. They use material which is actually very stiff so it won't curl. This is fine as long as you need that material, but we'll come to that later.
The other issues with electric screens are the "screen masking", housing and control. If you watch many different aspect ratio programmes then a screen which has electric masking may be an idea. This has the same effect as the black velvet edging on a fixed frame. These, highly complicated screens have a hefty price premium though and are not for the tight walleted. They do offer the ultimate picture quality though.
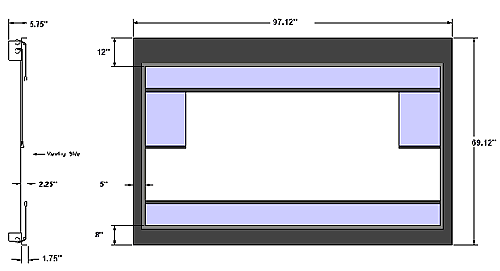 Screen capture courtesy of Stewart Filmscreens
Housings are available which attach on to walls or in ceilings. Many of the in-ceiling ones also have the addition of a "trapdoor" where the screen comes out. These are great for fitting flush in a ceiling. Press the button and the door opens and down slides the screen, then when it goes back up it catches on to the trap door and pulls it shut again. This is much nicer than leaving a cut out groove where the screen has to slide down. If you're thinking that you wouldn't mind a thin strip cut out of your ceiling then remember this. The bigger the drop of screen the wider the rolled up screen becomes. As the screen unrolls it can therefore travel well over an inch in distance either away or towards you. Combine this size with the size of the cut out required to allow the weighted hanger in to the ceiling cavity and the extra expense for the trapdoor starts to look more appealing.
Control of these screens is generally by a switch on the wall. The motors all work off 240volts and the best manufacturers use high quality ones which move elegantly and quietly. For those of you with IR learning remotes there is usually the option of an IR controlled relay to carry out the, ALL UP, ALL DOWN, STOP commands. Some have relay's which are controllable by suitable trigger voltages from projectors, while lighting control systems such as Lutron can control screens directly.
Material:
Material science has helped develop a large range of screen surfaces. Stewart Filmscreens have even won two Oscars for their work developing screens for commercial cinema's. The screen material is trying to reflect light back at the viewer in a uniform way so that there is no colour change throughout the viewable spectrum and that there is enough light output to make viewing possible. This relatively simple task has to be accomplished throughout the entire viewing area.
You'll see specifications for screen material such as 1.00Gain or 2.00 Gain. This is a spec relating to the perceived brightness of the screen. A 2.00 Gain screen reflects back more light than a 1.00 gain screen. The trade off is that the higher the gain, generally, the narrower the viewing angle. Increased gain also often increases the chances of "Hotspotting": where certain parts of the projected image look brighter than surrounding areas, and "Colour Shift" where blue and red halo's start to appear around folk depending on where you are seated.
Some screen manufacturers, like Stewart, provide software for their dealers which allows the simple calculation of what the ideal screen material is for any projector and screen size. Generally it's best to never go above 1.5 gain unless you have a really dim projector or are in a high ambient light area. The other small problem with higher gain screens is that their construction makes them more susceptible to damage. Usually they have beaded or a "rough" surface. If they aren't stored carefully then folds and creases can leave obvious marks on the surface. At the end of the article I'll show an equation for working out what sort of brightness you can achieve with different projectors and screens.
Some materials are available in acoustically transparent versions. These are ideal for that real stealth cinema look where the speakers are actually behind the screen! Usually these are the normal materials with pin holes punched in them. This is what's used at the cinema. However, at the cinema you're sitting a fair bit back from the screen so you don't see the holes. Ideally you would use smaller holes in a domestic situation. The drawback to these screens are two fold. First, they are less bright. Typically 10% + less bright. The human eye is supposedly unable to differentiate a smaller than 10% difference in light output though, so if possible try for a smaller than 10% figure. Stewart Filmscreens THX approved micro-perf is 8% for instance. Secondly, they usually aren't suitable for use with fixed panel projectors such as LCD or DLP as the panels pixels line up with the holes creating a very distracting diffraction pattern. Your screen supplier will be able to advise on this though, but remember to CHECK…
Screen Research from France have just launched a new material that is acoustically transparent and has ISF approval for video image quality. This new screen is claimed to not cause moiré interference with fixed pixel devices but I believe it could have a big effect on reflected light levels. I am investigating this further as we could be looking at a new technological leader here.
Now, all these screen materials have been designed for CRT based devices or for high ambient light playback on fixed panel projectors. That's why they usually have a "gain" above 1. They are trying to compensate for the low light output of CRT. Modern fixed panel projectors, even very modest LCD based units, have a pretty high light output but they suffer from a different problem. They can't produce dark blacks. Nowadays though there's a solution. A grey screen.
Yes, it sounds strange but it's true. Neutral grey has no colour in it. Now, if the lights are all off in your room and you look at a screen that's grey, not white, it'll look darker. Fire a red image at it and the image on the screen will be red, just not as bright as with the white screen. This simple trick allows black levels to be lowered from LCD/DLP and D'Ila projectors. These grey screens are usually available in different gains as well. These will be negative gain of around.85 up to a positive gain of around1.3 The higher gain grey screens reject ambient light reflections well and can be used quite effectively in rooms with light coloured reflective walls. However you need to be aware that they are effectively low gain backings with very high gain top coats. This means that their viewing cones are much narrower than a similar gain white screen.
So how do you work out the best screen material? Well, firstly we need to make sure we are going to get an acceptably bright image in our chosen viewing environment. Here comes the maths bit...
(screen gain) x (projector output in ANSI lumens)/Sqft of screen = Peak White level measured in Foot Lamberts or ftL.
Your typical direct view TV is about 32-35 ftL, a cinema is around 11-12ftL and in a room where you can control the light you should be looking for at least 8ftL. If you want to view in high ambient light then look at around 12+ftL. However, this is only half the story. A quality image is all about signal to noise ratio's or how big the difference is between black and white. Rather than looking at getting higher gain screens or brighter projectors usually a much more cost effective solution is to re-decorate the room. Having extremely bright "whites" isn't much use when "black" looks more like "white". We want Darth Vader to look like he hasn't given his clothes one too many Persil washes! Black is "the absence of light" it can't be projected so when all the lights are off and you're looking at your screen the colour it is will be how black you're going to get black and that's before we even consider how good your projector is at achieving such a simple task as not outputting any light. (but that's another article all together) With a high dynamic range in well blacked out room even projectors with modest light outputs can give very acceptable results.
So now we've got some levels for different screen materials, let's check which are suitable for our seating arrangements. Start with where folk are going to sit and how large a screen they are going to be looking at. Draw a plan of the room and work out how far off to the side the furthest viewer is going to be. Then look at the angle. Make sure you get a material with at least this viewing angle or that person isn't going to be getting a great image. The screen manufacturers will be able to supply this information.
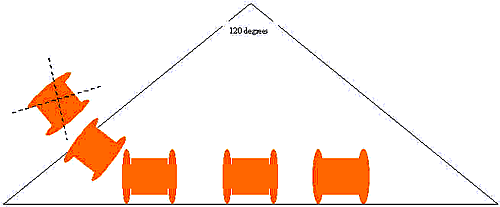
So now you should have a choice of screen materials which will allow the whole audience to view the picture. All you have to do is combine that material with the frame of your choice and add any extras' such as electric masking or black velvet coverings to get the ideal specification for your system. Now you can email me with your requirements.. Easy! Oh..not quite…one last thing
Where to put the PJ?
These screens are usually designed to reflect light back at an angle equal to how it strikes the screen. The angle of incidence = the angle of reflection. Look at the following diagram and you can see the angle the light from the PJ hits the screen is equal to the angle it is reflected back. From this you can see that a ceiling mount PJ with a screen that behaves this way gives an ideal amount of light sent back to the viewers sitting on chairs on floor.
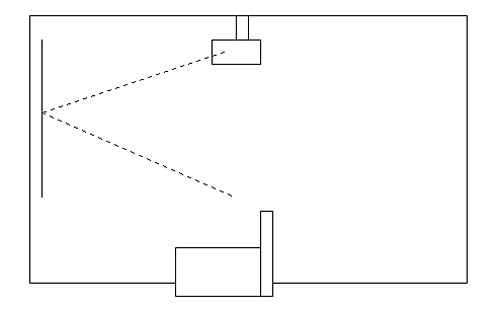
Now if the PJ was floor mounted you can imagine that the light would mainly be reflected over the heads of the viewers. For a floor mounted PJ you should look for retro-reflective screen materials that will fire the light back directly on the course it hit the screen at. Generally we wouldn't recommend floor mounting PJ's as material choice is limited and having a table mounted PJ just asks for trouble with children, animals or more likely yourself knocking in to or spilling stuff on it.
To recap then, your priorities are: get your room as dark as possible, work out the optimum seating arrangement, choose the style of frame housing you require, do the maths to work out your ideal material and ideal location for both PJ and screen. Once you have achieved all of the above, it is then time to pat yourself on the back, pour yourself a nice cold one, sit back and press 'play'. Oh, I take it you have sorted out all your electronics by now?
If you have questions about any of this or about general video please feel free to email us at
helpme@convergent-av.co.uk
(Click here to go back to Articles archive)
Copyright ©2003-2011 Convergent-AV. Not For Re-Publication.
|

